Friday, July 31, 2009
Ohio Star
Block finishes at 6"
Other versions of this block can be seen here.
Uses QST from Collection # 2 and Squares from Collection # 1 or the POTC collection
QST means Quarter Square Triangle
Martha's block on the left, Elly's block on the right.
Fabric 1 (Background)
1 piece 5.75 x 5.75", for printing 4 squares
1 piece 4 x 7.5" for printing a total of 2 sets of QST.
Fabric 2 (Focus)
1 sheet 4 x 7.5" (if you're hand-piecing, you will want to print QST on this one too, if you're machine-piecing, it is not necessary).
1 square, 2.5"
From page 106 of Collection # 2, pick the ink-colour that will work best with your lightest fabric.
Cut a 4 x 7.5" square and same size of freezer-paper.
Iron freezer-paper to the front / right side of the fabric.
Print 8 QST
From page 59 of Collection # 1, pick the ink-colour that will work best with your lightest fabric. Cut a 5.75" square and same size of freezer-paper.
Iron freezer-paper to the front / right side of the fabric.
Print 4 squares that finish at 2"
Making the block :
Check Linda's Triangle Tips on how to make the QST, or check the Inklingo Handbook, p. 64-65.
Make 4 sets of QST blocks. Each set should measure 2.5" unfinished to give a 2" finished size.
Lay out the component parts solid and QST squares, so you are certain that everything is there.
Join as you would a 9-patch.
Finished.
If you know of other patterns or books that uses this block in this size, please let me know, and I'll make links to each of the ones I'm aware of. miz_pal (at) hotmail (dot) com.
Barbara Brackman's "Encyclopedia of Pieced Quilt Patterns" # 1631.
Friday, July 24, 2009
Shoofly
Block finishes at 6"
Uses Collection # 2 for the HST and Collection # 1 or the POTC collection for the squares.
Elly has made this week's "other colourway" block , and you can see more interpretations of it right here.
HST means Half Square Triangles
This is another very simple block, which is - basically - just a scrambling around of the same components you used for the Friendship Star.
Fabric 1 (background)
5.75" square for printing the squares
3.5 x 6.75" for printing HST
Fabric 2 (focus)
3.5 x 6.75" for layering with the printed HST fabric (if machine-piecing, for hand-piecing, print this too).
One 2.5" square. (I used a different, but compatible, scrap for the centre on this one)
From page 59 of Collection # 1, pick the ink-colour that will work best with your lightest fabric. Cut a 5.75" square and same size of freezer-paper.
Iron freezer-paper to the front / right side of the fabric.
Print 4 squares that finish at 2"
From page 70 of Collection # 2, pick the ink-colour that will work best with your lightest fabric.
Cut a 3.5 x 6.75" piece of fabric and same size of freezer-paper.
Iron freezer-paper to the front / right side of the fabric.
Print 4 HST with a finished (square) side at 2"
Layer the two fabrics that are each 3.5 x 6.75", right sides together.
Sew on the diagonal (dotted) lines.
Cut on all the straight (whole) lines.
Iron your HST to the dark.
Lay out your solid and your HST squares to form a Shoofly block.
Join as you would a 9-patch.
Finished
This block, in this size, is used in the Shipshewana Blessings quilt.
If you know of other patterns or books that uses this block in this size, please let me know, and I'll make links to each of the ones I'm aware of. miz_pal (at) hotmail (dot) com.
Barbara Brackman's "Encyclopedia of Pieced Quilt Patterns" #1645
Friday, July 17, 2009
Friendship star
Elly's Freindship Star on the left, Martha's on the right.
To see other interpretations of this block, look here.
This is a very simple star to make, and therefore also has very simple printing instructions.
Uses Collection # 2 and finishes at 6"
HST means Half Square Triangle
One Block
Fabric 1 (Background fabric) :
3.5 x 7" for printing
5.75" square for printing
Fabric 2 (Focus fabric) :
1 square, 2.5"
3.5 x 7" (for layering with the printed fabric)
(OR, if you're handpiecing, print this piece too)
Read this file on Printing Custom Sizes.
On making HST and QST with Inklingo, check out the Triangle Tips (another free pdf from Linda Franz) or the Inklingo Handbook p.58-63, OR Linda's new video on her blog, right here.
From page 70 of Collection # 2, pick the ink-colour that will work best with your lightest fabric.
Cut a 3.5 x 7" piece of fabric and same size of freezer-paper.
Iron freezer-paper to the front / right side of the fabric.
Print.
Layer the two fabrics that are each 3.5 x 7", right sides together.
Sew on the diagonal (dotted) lines.
Cut on all the straight (whole) lines.
Iron your HST to the dark.
From page 59 of Collection # 1, pick the ink-colour that will work best with your lightest fabric. Cut a 5.75" square and same size of freezer-paper.
Iron freezer-paper to the front / right side of the fabric.
Print.
Cut apart.
Lay out your solid and your HST squares to form a friendship star.
Join as you would a 9-patch.
Finished
If you know of other patterns or books that uses this block in this size, please let me know, and I'll make links to each of the ones I'm aware of. miz_pal (at) hotmail (dot) com.
Barbara Brackman's "Encyclopedia of Pieced Quilt Patterns" # 1657 (at least that's the one which comes the closest).
Thursday, July 16, 2009
Making hexagons into squares
One is, to applique the hexagon to a piece of back-ground fabric. Cut the fabric at 7.5", so you have some leeway with regard to placement of the hexagon.
Another option is :
On the paper-side of a sheet of freezer-paper, print a sheet of 1.5" triangles without seam-allowance (collection 3, page 145)
Cut out one (or more) 3" triangles, using the print as your guide. You may want to mark your cutting-lines with a marker.
Fold down the middle.
Cut the fold.
You now have two reversed half-triangles, whose longest side is the 3" you need.
Prepare your setting-triangles the "old-fashioned" way, ironing them to the wrong (!) side of the fabric, marking your stitching-line around the template, and then cutting 0.25" outside the stitching-line.
Join these to each their corner of the hexagon
Cut 2 strips, each 1 x 6.5"
Join a strip to each side of the rectangle.
Trim to 6.5" (which is what a 6" finished block measures before you join it to anything else)
The third (and by far simplest) version is, to download the half-triangles that constitute the Inklingo KISS (keep it simple, stitchers) collection # 101.
You still need to put a strip on the top and button of the block, but the triangles in that collection will ensure that you don't have to mess around and make the corners yourself. Just print, and they are ready to roll.
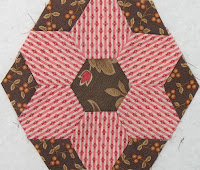
Hexagon bonus-block # 1
To satisfy the hex-lovers out there, I've decided to put in a few bonus-blocks that finish as hexagons. I will strive to make them so that they get 3" finished sides, and thus should be able to fit together in the end. BUT, as is the case with the square blocks, I make no promises.
You can see more interpretations of this block right here.
And Linda from NY is making hexagon blocks with me, her version of this block is to the right.
The first hexagon bonus-block is a flower ; the basic flower that you use for Grandmother's Flower Garden.
Cathi Godwin has a tutorial on how to do this flower the old-fashioned way, by hand-piecing, so I thought I would use this space to show my way of hybrid-piecing of this block.
As you can see, this block does not only sport the flower, there are some "leaves" around it to make it into a regular shaped hexagon.
If you make it by hand-piecing only, make the flower first, and then join the leaves in the "holes"
Fabric 1 (background / leaves)
3.5 x 6" (printed landscape)
Fabric 2 (focus A, flower petals)
6 x 8.5"
Fabric 3 (focus B, center)
1 charm / scrap the size of your printer's minimum size. Mine is 3.5 x 5"
From p. 22 of collection 1, pick the ink-colour that works best for your petal-fabric. Cut a piece of fabric 6 x 8.5" and freezer-paper the same size.
From p. 55 of collection 1, pick the ink-colour that works best with your leaf-fabric. Cut a piece of fabric 3.5 x 6" and freezer-paper the same size.
Print, and remember to print in landscape.
From p. 22 of collection 1, pick the ink-colour that works best for your center-fabric. Cut a piece of fabric the smallest size your printer will accept, and freezer-paper the same size.
Print.
... or use one of your printed petal-pieces as a template to cut the centre hexagon from a small scrap. 2.5" square should do the trick.
You can make this block the same way you would any hexagon flower block, and then add the diamonds to "fill in" the edges of the block and make it a straight-sided hexagon with 3" sides.
You could also make it by hybrid-piecing. The below is one way of doing that. There are more, but this is the one that works best for me.
Machine-sewing :
Join 3 petal hexagons to the central hexagon (picture left)
Join 2 diamonds to each side of the 3 remaining hexagons (picture right)
Hand-sewing :
Join the leaves+petal units to the centre-unit.
If you click on the picture, you can see some green arrows, showing you what seams to join.
There are lots of inset seams here, so hand-piecing is the logical option ... unless you are extremely good freinds with your sewing-machine ... in which case, you probably would not join the flower as I have here.
Answer to Leslie's Comment :
Yes, I go from cross-hair to cross-hair when I machine-piece hexagons or other seams that needs to be opened (diamonds, both 60- and 45-degree ones come to mind). If you don't want to do that, leave a short end of thread before and after each seam, and then unpick the stitches that are in the seam-allowance. The slightly longer thread-end is, so that the seam will not unravel on you, the unpicking so that you can fully open the seam when pressing.
Friday, July 10, 2009
9 patch - 6" finished size
Other interpretations of this block can be found here.
This one uses collection 1 OR the Patchwork of the Crosses / Lucy Boston collection. Both have a 1" and a 2" square.
One Block (6" finished)
Fabric 1 (Background Fabric)
5.75" square
OR, since you will be using at least 16 2" squares for this and the next couple of blocks, you might want to print 8 squares on a piece of 5.5 x 10.75" fabric (printed landscape), or 12 squares on an 8 x 10.75" fabric.
Fabric 2 (Focus Fabric)
5.75 x 8.25"
On page 59 in Collection # 1 or page 52 in the POTC collection, pick the ink-colour most suitable for your fabric. You have to print 6 squares of Fabric 2, and thus will have 1 surplus.
For machine-piecing you need to print only one of the fabrics, for hand-piecing you will want to print both.
Cut out the squares from both fabrics at the same time, by layering the printed sheet on top, and the un-printed one below.
Lay out the 9-patch.
Join 3 sets of AB
Press to the darker fabric.
Join another square to each set, so you have 2 sets of BAB and 1 set of ABA.
Join the 3 strips to form a 9-patch.
Finished !
Doll-quilt :
To make 12 blocks, each 6" square, the requirements are :
Fabric 1 (Background Fabric)
4 sheets, each 8 x 10.75" (portrait)
Fabric 2 (Focus Fabric)
5 sheets, each 8 x 10.75" (portrait)
This block, in this size, is used in the Shipshewana Blessings quilt.
If you know of other patterns or books that uses this block in this size, please let me know, and I'll make links to each of the ones I'm aware of. miz_pal (at) hotmail (dot) com.
Brackman's Encyclopedia # 1601
Friday, July 3, 2009
LeMoyne star
To see other interpretations of this block, click right here.
She and Monkey even printed and made some lovely, bright LeMoyne stars for us to start with :-)
Directions on how to download an Inklingo collection, are here.
The free download on printing custom paper sizes is right here.
One Block
Fabric 1 (Background Fabric)
3.75 x 8" (printed in Portrait mode)
On page 30 of the Free Collection, you find the catalogue of the combo shape-collection. Pick the ink-colour that works best with your fabric, and print 1 set.
Fabric 2 (Focus Fabric)
Either 3.5 x 9.75 (printed in Portrait mode)
OR 5.25 x 6.5" (printed in Landscape mode)
On page 8 of the free collection, you find the catalogue of the diamond shape. Pick the ink-colour that works best with your fabric and print 1 set.
Directions / Help on how to sew a LeMoyne Star can be found in chapter 1 of the Inklingo Handbook. This chapter is a free download, and comes with the free collection (pp H1 - H48).
Before you start joining the bits, lay them all out on a scrap piece of batting, to make sure you have all the bits.
I prefer to do LeMoyne stars by hybrid piecing. I piece the star by machine and do the inset seams by hand.
If you want to make this block a 6" finished, cut 2 strips 1.25 x 5" and 2 strips 1.25 x 6.5 ", and 'log-cabin' the block.
6" LeMoyne Star
This star is sewn exactly like the above. The only difference is in their finished size, and therefore, in the fabric requirements.
One Block
Fabric 1 (background)
4.5 x 9.75" (portrait)
Fabric 2 (focus)
4 x 11.5 " (portrait)
or
6.5 x 7.5" (landscape)
Doll-quilt :
To make 12 blocks with same background-fabric throughout, here are the requirements when using the free (4.5") collection
Fabric 1 (Background Fabric, page 30)
4 sheets, each 7.75 x 10.5", printed in landscape mode
Fabric 2 (Focus Fabric, page 8)
4 sheets, each 7.5 x 12.25", printed landscape mode
OR
4 sheets, each 7.75 x 11.5", printed portrait mode
OR
6 sheets, each 6.25 x 7.5", printed portrait mode (in case you only have letter-size freezer-paper)
You could also do like Linda has done : Print the combo on p. 32 and make two (or more) mirror-image blocks. One combo-set reqires a sheet, 6.75 x 9.75"
You will also need fabric for sashing (if you want that) or setting-squares, and for border, binding and backing as well. The requirements above are solely for the making of the blocks.
This block, in the 4.5" size, is used in the Dear Jane quilt.
If you know of other patterns or books that uses this block in either of these two sizes, please let me know, and I'll make links to each of the ones I'm aware of.
You can contact me at : miz_pal (at) hotmail (dot) com.
Wednesday, July 1, 2009
Starting out
All blocks will be made using Inklingo, and the general aim (in my mind) is to end up with some sort of quilt, BUT, I make no promises ... not even to myself.
My hope is, that the blocks shown here might inspire. Either to make your own sampler, to try and follow my widely meandering footsteps, or to just attempt one or two blocks that you like.
Also, if you need some inspiration to try out some of the various shapes found in the collections you own, it is my hope that you might find a place to start, right here.
The first couple of months, you will be able to get by using only scraps. The blocks are simple, and none of them require a lot of fabric, so ... how much better can it get ? Getting to know the program you already have, and using a few scraps.
Since I am "just doing it", I have no idea what-so-ever how big the sampler will be, how many different blocks I will end up making, or, indeed, how big the individual blocks will be
I will attempt to make the blocks into "Full inches square", but it will not always be possible.
Before you embark on this adventure with me, you might want to download some of the free resources that are on the Inklingo (commercial) web-page.
Download instructions (as most of Inklingo is now web-based and only exists as downloads)
Monkey's Guided Tour.
The Inklingo Demo Video.
Printing Custom Sizes.
Chapter 1 of the Inklingo Handbook.
All of the above are great resources. And then there is the Free Collection.
There is much help and companionship to be found at the Inklingo Group with Yahoo, but you need to be a member to read the posts and access the resources.
You do not need to be a member to see all the many and varied projects that Inklingoists are making, you can check them out at the Inklingo Projects blog.
I hope you will join me in this adventure, and that we will all find it an enjoyable, if somewhat unstructured quest.
The fabrics I use are :
Cinnamon and Spice by Jo Morton for Andover
Charleston IV by Judie Rothermel for Marcus
Ecru ton-sur-ton by Den Haan & Wagenmakers (found here)